Review: System 76 Wild Dog Pro

Recently, I was trying to work on the desktop at my office and it kept rebooting. Nothing in the logs nor anything to indicate that there might be a software issue, so I just assumed that my now 5 year old machine was probably at its end of life.

Without hesitation I decided to order a new desktop from System 76. I really liked the Sables we bought from them last year, so I figured it would be simple to order a Linux-compatible machine from them.

I went to their “Desktops” page and without much thought decided on the “Wild Dog Pro“. I don’t have huge requirements, so the big monster with wheels the “Silverback” (probably named after the gorilla) was right out. I picked more of a middle of the road machine with the following specs:

  • Case: Black brushed aluminum
  • CPU: 4.2 GHz i7-6700K (4.0 up to 4.2 GHz – 8MB Cache – 4 Cores – 8 Threads) + Liquid Cooling
  • Memory: 32 GB Dual-channel DDR4 at 2133 MHz (4× 8 GB)
  • Graphics: 2 GB GTX 960 Superclocked with 1024 CUDA Cores
  • Storage: 1 TB 2.5″ Solid State Drive
  • Dual Layer CD-RW / DVD-RW
  • WiFi up to 867 Mbps + Bluetooth
  • 3 Year Limited Parts and Labor Warranty

I also ordered two day shipping, since I thought I would need it fast.

I got an order confirmation almost immediately with an estimate of 2 to 6 days to ship. Soon after that I got a note stating that the Wild Dog was running toward the latter end of that range. I figured I could just use my laptop until the new machine arrived if necessary, and I waited.

While I was waiting, I still continued to use my old desktop. I noticed the rebooting issue happened toward the end of the day. It finally dawned on me (I’m a little thick) that it might be heat related. I crawled under the desk to find that the power supply fan wasn’t working. I ordered a new one of those to see if it would help.

Since the new power supply arrived before the Wild Dog shipped, and it fixed my issue, I contacted System 76 to see if I could change the shipping from “speedy” to something more like “camel”. They were happy to do it and refunded the difference in price.

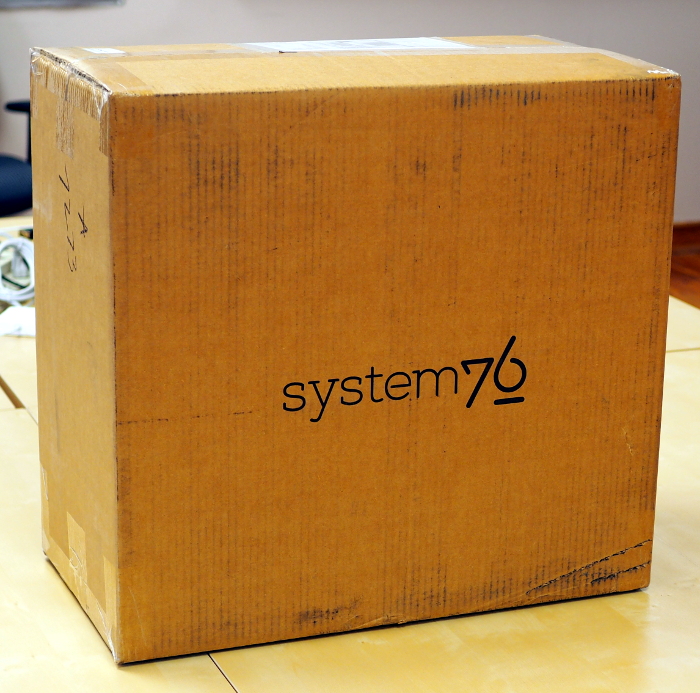
Anyway, the new machine finally arrived (I ordered this on 29 January and got it on 16 February – a little slow but faster than Lenovo and Dell have been for me in the past). It showed up in a standard brown box:

Wild Dog Pro Box

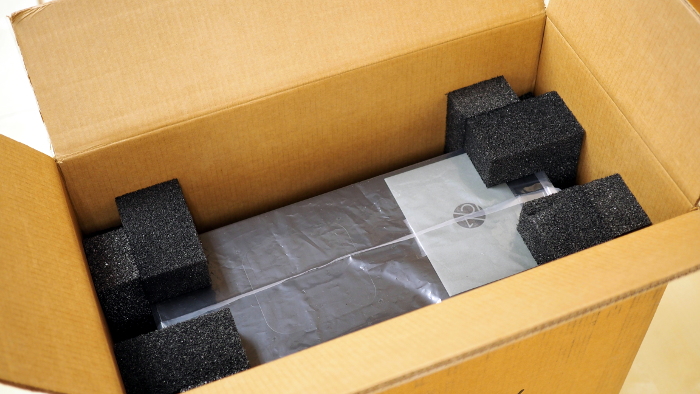
The unit was minimally packaged inside (which I like):

Wild Dog Pro Box Open

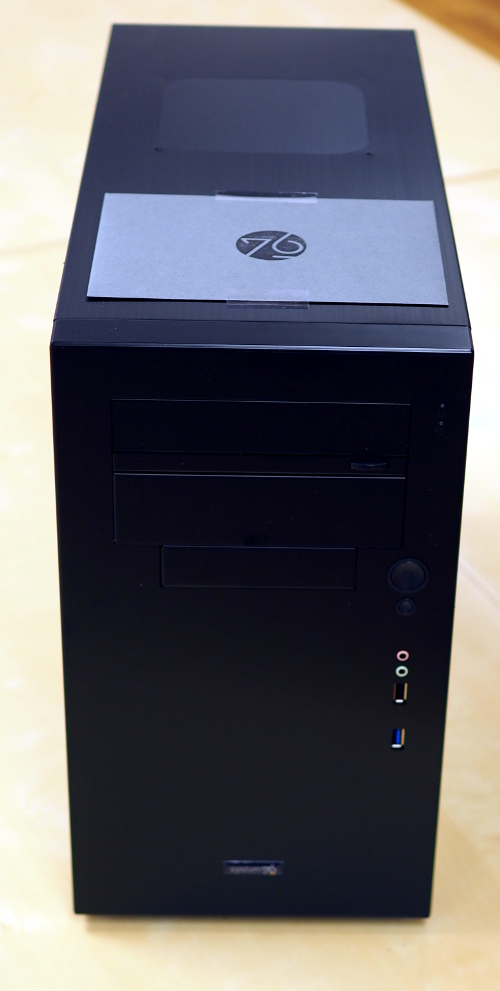
Pretty case with a minimalist look:

Wild Dog Pro Front

with all of the “business” being on the back:

Wild Dog Pro Back

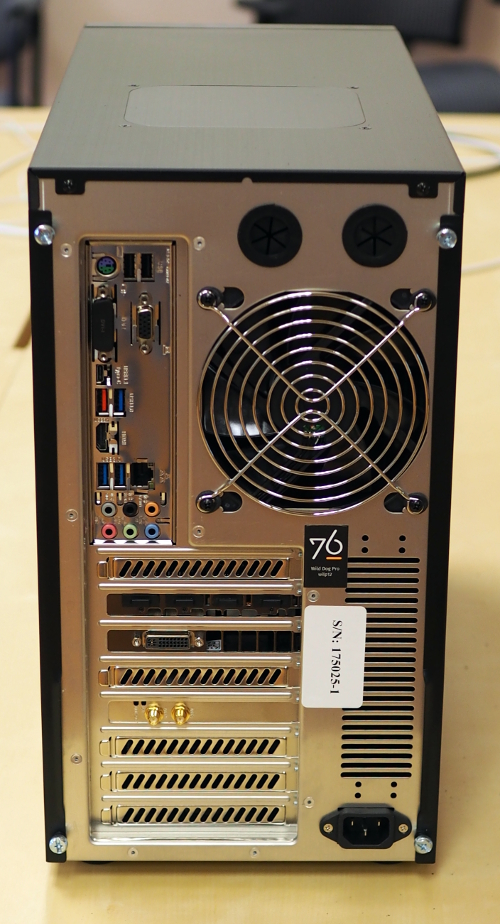
This has USB 2.0, USB 3.0 and USB 3.1 ports, including a USB-C connector should you be into such things.

I like the case, but they tape a letter on the top that, when removed, you can still see the marks left by the tape. I haven’t hit this with goo cleaner since it is going under my desk, but it did detract from the overall look of the unit. The letter contained a welcome note and some stickers, as well as a little cut-out dude called the “Desktop Sentinel” and named “M3lvin”. Not quite sure what that is, and a quick Google search turned up nothing.

Wild Dog Pro Letter

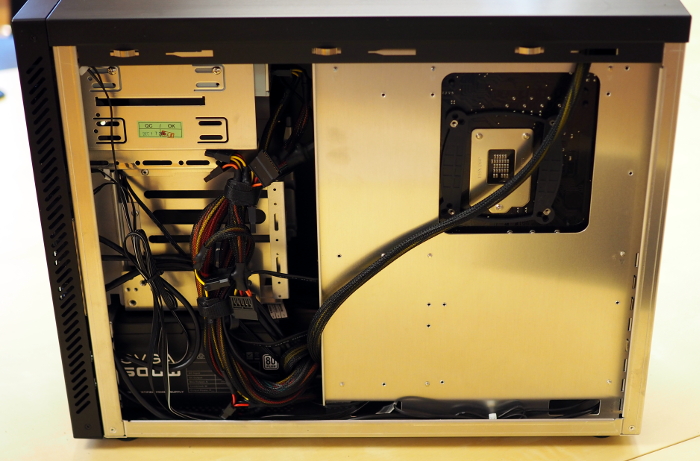
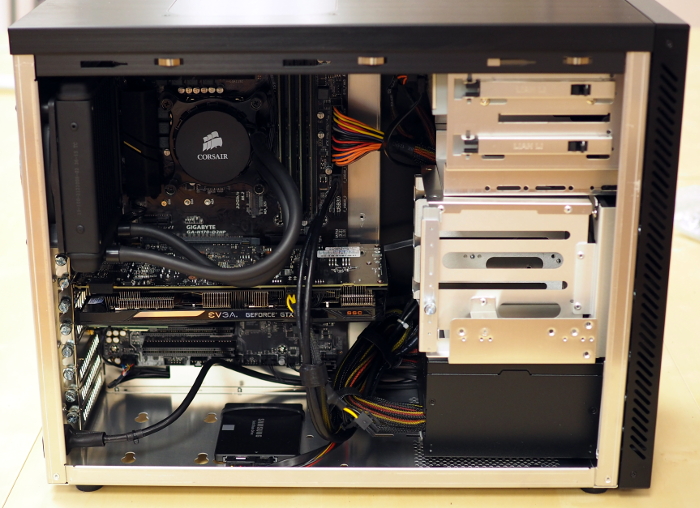
Of course, the first thing I did was open it up. The case is nice, although I’ve grown used to captive screws to remove side panels and was surprised when the two I took off came completely off. The system is well laid out inside with room for expansion (I wanted to put in a backup SATA drive to go with the SSD).

Wild Dog Pro Right

Wild Dog Pro Left

I can’t tell you much about the performance. It seems plenty fast, and I downloaded the test suites from Phoronix but just didn’t have the hours to run them for benchmarks. While it ships with Ubuntu 15.10, I’m a Linuxmint guy so I immediately went to install Mint on the machine.

This was harder than I thought it would be. I could not get the BIOS to boot off of the USB stick no matter what I tried (it saw the stick in the boot menu but wouldn’t boot to it). I ended up burning the image to DVD and, while slower, worked fine.

Then it dawned on me that they probably shipped with Ubuntu 15.10 because it has one of those fancy “Skylake” processors which benefits from later kernels. Luckily I had run into this with my Dell laptop, so I installed gcc-4.9 and the 4.4 kernel and everything worked but the wireless card. Turns out you need to install the latest ndiswrapper and you’ll be good to go.

Needless to say I’m eager for Mint 18 to come out with support for the later kernels.

Overall, I’m happy with my purchase. There is room for improvement on the speed of producing it and shipping it out, but my decision to use Mint was totally on me. I look forward to getting many hours of use out of this machine.

OpenNMS Horizon 17.1 Released

As some of you may have noticed, Horizon 17.1 has been released. As Horizon 17 will form the basis for Meridian 2016, I’m extremely happy to see how much progress has been made on fixing issues.

Be sure to check out the Release Notes.

Horizon is our rapid release version, and its goal is to get all the cool new features out as soon as they are ready. In this case, right about release we discovered an annoying but easy to fix bug with provisioning, so if you plan to run Horizon 17.1 you should also apply this patch.

Have fun, and we hope you find OpenNMS useful.

Bug

  • [NMS-4108] – Bad suggestions in install guide
  • [NMS-7152] – Enlinkd Topology Plugin fails to create LLDP links for mismatched link port descriptions.
  • [NMS-7820] – snmp-graph.properties.d files with –vertical-label="verticalLabel" in config
  • [NMS-7866] – Incorrect host in Location header when creating resources via ReST
  • [NMS-7910] – config-tester is broken
  • [NMS-7953] – Opsboard and Opspanel use wrong logo
  • [NMS-7966] – Unable to generate eventconf if a MIB (improperly?) uses a TC to define a TC
  • [NMS-7988] – container features.xml still references jersey 1.18 when it should reference 1.19.
  • [NMS-8000] – Topology-UI shows CDP links not correct
  • [NMS-8014] – Backshift graphs show dates in UTC instead of the browser's timezone
  • [NMS-8017] – StrafePing: Unexpected exception while polling PollableService
  • [NMS-8023] – Grafana Box did not work anymore
  • [NMS-8026] – Constant Thread Locking on Enlinkd
  • [NMS-8029] – Wrong use of opennms.web.base-url
  • [NMS-8038] – NRTG with newts – get StringIndexOutOfBoundsException
  • [NMS-8051] – The newts script only works if cassandra runs on localhost
  • [NMS-8054] – AlarmPersisterIT test is empty
  • [NMS-8064] – The 'newts init' script does work when authentication is enabled in Cassandra
  • [NMS-8065] – ReST Regression in Alarms/Events
  • [NMS-8066] – Newts only uses a single thread when writing to Cassandra
  • [NMS-8073] – User Restriction Filters: mapping class for roles to groups does not work
  • [NMS-8074] – The "Remove From Focus" button intermittently fails
  • [NMS-8079] – The OnmsDaoContainer does not update its cache correctly, leading to a NumberFormatException
  • [NMS-8084] – File not found exception for interfaceSTP-box.jsp on SNMP interface page
  • [NMS-8097] – Installation Guide Debian Bug Version 17.0.0
  • [NMS-8100] – Unable to complete creation of scheduled reports
  • [NMS-8103] – NPE when persisting data with Newts
  • [NMS-8104] – init script checkXmlFiles() fails to pick up errors
  • [NMS-8106] – INFO-severity syslog-derived events end up unmatched
  • [NMS-8109] – Memory leak when using the BSFDetector
  • [NMS-8112] – init script "configtest" exit value is always 1
  • [NMS-8116] – Heat map Alarms/Categories do not show all categories
  • [NMS-8119] – WS-MAN has broken ForeignSourceConfigRestService and the requisitions UI doesn't work.
  • [NMS-8123] – Removing ops boards via the configuration UI does not update the table
  • [NMS-8126] – JNA ping code reuses buffer causing inconsistent reads of packet contents
  • [NMS-8133] – Synchronizing a requisition fails
  • [NMS-8147] – Add all the services declared on Collectd and Pollerd configuration as available services on /opennms/rest/foreignSourceConfig/services

Enhancement

  • [NMS-7123] – Expose SNMP4J 2.x noGetBulk and allowSnmpV2cInV1 capabilities
  • [NMS-7978] – Add threshold comments and whitespace changes to match how the OpenNMS web GUI generates XML files
  • [NMS-8005] – Add support for using NRTG via Ajax calls
  • [NMS-8024] – Add support for OSGi-based Ticketing plugins
  • [NMS-8028] – Add event definition for postfix syslog message TLS disabled
  • [NMS-8030] – Improve the SNMP data collection config parsing to give more flexibility to the users
  • [NMS-8042] – set Up severities for RADLAN-MIB.events.xml
  • [NMS-8068] – Add support for marshalling NorthboundAlarms to XML
  • [NMS-8071] – Event definition file for JUNIPER-IVE-MIB
  • [NMS-8120] – Fixed a paragraph in the "Automatic Discovery" provisioning chapter
  • [NMS-8156] – Upgrade Angular Backend for the Requisitions UI

Review: Angel Sensor Fitness Tracker

Angel Sensor represents everything that’s wrong with the technology industry today.

TL;DR; Two years ago, Angel Sensor ran an Indiegogo campaign to create an “open sensor for health and fitness”. They implied that the software would be open source. I finally got mine this week and it is total bollocks. Not only is the software not open source, the app that goes with it is barely an app. There is little communication from the vendor to the community, and while the hardware is solid, it is too expensive to manufacture so the “classic” model is obsolete on delivery. Don’t deal with this company.

Okay, so I like metrics. I work on an open source project to monitor anything you reach over the network. I have a weather station at my house and a temperature sensor in my workshop. I am very eager to gather information about what’s going on in my body, and while companies like Fitbit make great products for that purpose, I distrust sending this most personal data to a third party.

So a couple of years ago I did a search on “open source fitness tracking” and came across Angel Sensor. This company claimed that they were going to create an open health platform where the software would be open source, so I bought an Angel Sensor wristband and eagerly awaited its arrival.

And waited. And waited.

Two years later, it finally arrived and it is a total disappointment.

First, the good.

The packaging is nice.

Angel Sensor Box

The band itself is in its own compartment, and on the side of the box is a little drawer that you can pull out containing the accessories:

Angel Sensor What's In the Box

You get the band, a small instruction booklet, a charging cradle and seven flexible clasps (of various lengths) that help hold the band to your wrist.

I picked out a clasp and pretty soon had it on my wrist:

Angel Sensor On Wrist

Although heavier than I would have expected, it felt comfortable, something I could wear 24/7. My LG Urbane watch is slightly thicker but overall a bit lighter:

Angel Sensor vs. LG Urbane

The instruction booklet says to charge the band fully before using, and this is where the problems started. The “classic” uses a charging cradle. At both ends of the band (where the clasp connects) are metal studs. You insert one set of studs (marked on the band) into the cradle to charge it. The problem is that there is nothing in the charger to really grab on to the studs, so in my case it kept losing the connection and charging would stop. I had to prop it up at an angle in order to keep a connection, and even then I wasn’t sure about it staying in place.

Which is a shame, since the band itself is rather stylish. While there is no screen, there are two white LEDs on each side of the band that can glow and pulse to let you know something is going on. I kept having to keep an eye on the LEDs to make sure the thing was still charging.

Note that all this is moot since the classic proved too hard to produce. The new unit is called the M1. The M1 is thicker and you lose water resistance, which I think is an important feature. While I don’t plan to dive with a fitness tracker, I might wash dishes while wearing it, so the ability to be submerged in liquid for a small amount of time is a requirement. The M1 does use a standard microUSB charging connector so that is a plus in its favor.

Summary to this point: solid hardware design, although now obsolete, with a major flaw in the charger.

My real disappointment set in with the software.

I knew something was wrong when they announced on their blog that the first app released would be iOS only. Now I don’t have a problem with people leading with the iOS version, it is a huge market, but when your market differentiation is based on being “open” one would assume that an Android version would be first to encourage more contribution. Alas, the Android version seems to be more of an afterthought. You want to see it? Here it is:

Angel Sensor Android App Screen

Yup. You’re looking at it. No menu, no explanation, just four values.

To get to this point, I downloaded the app from Google Play, launched it, and then paired it with the band. You do this by tapping on the band’s button once, which will cause it to vibrate. The sensor will then show up on the app’s screen and you can connect to it. Note that you have to do this every time you launch the app, or at least I did. The sensor will be identified by a number and a MAC address.

On the main screen you get what I assume to be heart rate, body temperature, number of steps and some unknown value represented in units of “g”. No history, no way to, say, gather and export collected data, no way to even change the temperature units from Celsius to Fahrenheit. The title bar does show connection strength and battery life, but the only other thing is a tab for firmware updates. From what I can tell, it doesn’t actually check anywhere for firmware updates, but it would give you the ability to install one should it be released.

Of course, the app doesn’t tell you the current firmware version, and there doesn’t seem to be a download section anywhere on the Angel website (the support section is just a duplicate of the FAQ section).

Oh, and if you turn it sideways, you get some graphs.

Angel Sensor Android App graphs

No explanation of what is actually being graphed, but it does wiggle around a bit. I did find a Youtube video that suggests the top two graphs are heart related and the bottom one is motion, and the IOS app shown in the video has more features, but since I don’t have a modern iPhone I couldn’t check it out.

Since I couldn’t believe this was it, I kept searching for software related to the Angel Sensor. I did manage to find some code on Github (which appears to be an SDK for accessing the API and perhaps the sad Android app). Of course, the License file is incomplete and doesn’t really say under what license the software is published. Once again people, access to source code doesn’t make it open source.

And this is the biggest flaw with Angel Sensor and one reason I have such an issue with the current technology environment. You have people like Paul Graham crowing about creating income inequality and that has resulted in a new start up life cycle. You come up with an idea (that hasn’t changed) but now you wrap it a bunch of buzzwords, like “open”, “IoT” and “mobile”, even if you don’t really understand what they mean.

Next, you raise some money through crowdfunding, often underestimating the amount needed so your “funding” can be a success. Now, remember, your audience isn’t the poor saps who decided to give you money – you want to show viability to VCs who can deliver the money you’ll actually need. You use the initial cash to build just enough product to either get a lot of investment or get acquired by someone wanting to cut a year or so off developing their own product. This is considered “success” in some circles.

(sigh)

This whole thing is a shame since there is a market for a truly open mobile health platform. I’m not insisting that the hardware be open (I’m not going to build my own silicon molds) but all the software, including the firmware, should be available under an OSI-approved license. Then you need to focus on building a community, and that really requires good communication.

Angel Sensor sucks at communication.

In addition to the total lack of documentation, even their blog fails miserably. In the last half of 2015 there were a total of three posts, the last one from 3 November. I used to be able to get a rapid response from a person named Io Salant, but when I wrote to them a few months ago asking for a status I got:

Io is on a well-deserved leave. Your email has been forwarded to hello@angelsensor.com
The team is quite busy, but will make every attempt to get to your email as quickly as possible.

Of course, never heard back. So my now “classic” Angel Sensor is destined for eBay.

In summary, this is another case of a crowdfunded effort done by people in over their heads with no real desire to create something that lasts but to make money at the expense of their customers. I wouldn’t trust Angel Sensor to feed my dog, much less monitor my health, and I can only hope someone with actual ability will come out with a truly open personal medical platform.

Add a Weather Widget to OpenNMS Home Screen

I was recently at a client site where I met a man named Jeremy Ford. He’s sharp as a knife and even though, at the time, he was new to OpenNMS, he had already hacked a few neat things into the system (open source FTW).

Weathermap on OpenNMS Home Page

One of those was the addition of a weathermap to the OpenNMS home page. He has graciously put the code up on Github.

The code is a script that will generate a JSP file in the OpenNMS “includes” directory. All you have to do then is to add a reference to it in the main index.jsp file.

For those of you who don’t know or who have never poked around, under the $OPENNMS_HOME directory should be a directory called jetty-webapps. That is the web root directory for the Jetty servlet container that ships with OpenNMS.

Under that directory you’ll find a subdirectory for opennms. When you surf to http://[my OpenNMS Server]:8980/opennms that is the directory you are visiting. In it is an index.jsp file that serves as the main page.

If you are familiar with HTML, the JSP file is very similar. It can contain references to Java code, but a lot of it is straight HTML. The file is kept simple on purpose, with each of the three columns on the main page indicated by comments. The part you will need to change is the third column:

<!-- Right Column -->
        <div class="col-md-3" id="index-contentright">
                <!-- weather box -->
                <jsp:include page="/includes/weather.jsp" flush="false" />

Feel free to look around. If you ever wanted to rearrange the OpenNMS Home page, this is a good place to start.

Now, I used to like poking around with these files since they would update automatically, but later versions of OpenNMS (which contain later versions of Jetty) seem to require a restart. If you get an error, restart OpenNMS and see if it goes away.

Now the weather.jsp file gets generated by Jeremy’s python script. In order to get that to work you’ll need to do two things. The most important is to get an API key from Weather Underground. It is a pretty easy process, but be aware that you can only do 500 queries a day without paying. The second thing you’ll need to do is edit the three URLs in the script and change the location. It is currently set to “CA/San_Francisco” but I was able to change it to “NC/Pittsboro” and it “just worked”.

Finally, you’ll need to set the script up to run via cron. I’m not sure how frequently Weather Underground updates the data, but a 10 minute interval seems to work well. That’s only 144 queries a day, so you could easily double it and still be within your limit.

[IMPORTANT UPDATE: Jeremy pointed out that the script actually does three queries, not just one, so instead of doing 144 queries a day, it’s 432. Still leaves some room with 10 minute queries but you don’t want to increase the frequency too much.]

Thanks to Jeremy for taking the time to share this. Remember, once you get it working, if you upgrade OpenNMS you’ll need to edit index.jsp and add it back, but that should be the only change needed.