I am working hard to digitize my life. Last year I moved for the first time in 24 years and I realized I have way too much stuff. A lot of that stuff was paper, in the form of books and files, so I’ve been busy trying to get digital copies of all of it. Also, a lot of my my life was already digital. I have e-mails starting in 1998 and a lot of my pictures were taken with a digital camera.
TL;DR; This is a tutorial for using the open source rclone command line tool to securely synchronize files to a cloud storage provider, in this case Backblaze. It is based on MacOS but should work in a similar fashion on other operating systems.
That brings up the issue of backups. A friend of mine was the victim of a home robbery, and while they took a number of expensive things the most expensive was his archive of photos. It was irreplaceable. This has made me paranoid about backing up my data. I have about 500GB of must save data and around 7TB of “would be nice” to save data.
At my old house the best option I had for network access was DSL. It was usable for downstream but upstream was limited to about 640kbps. At that rate I might be able to backup my data – once.
I can remember in college we were given a test question about moving a large amount of data across the United States. The best answer was to put a physical drive in a FedEx box and overnight it there. So in that vein my backup strategy was to buy three Western Digital MyBooks. I created a script to rsync my data to the external drives. One I kept in a fire safe at the house. It wasn’t guaranteed to survive a hot fire in there (paper requires a much higher temperature to burn) but there was always a chance it might depending on where the fire was hottest. I took the other two drives and stored one at my father’s house and the other at a friend’s house. Periodically I’d take out the drive from the safe, rsync it, and switch it with one of the remote drives. I’d then rsync that drive and put it back in the safe.
It didn’t keep my data perfectly current, but it would mitigate any major loss.
At my new house I have gigabit fiber. It has synchronous upload and download speeds so my ability to upload data is much, much better. I figured it was time to choose a cloud storage provider and set up a much more robust way of backing up my data.
I should stress that when I use the term “backup” I really mean “sync”. I run MacOS and I use the built-in Time Machine app for backups. The term “backup” in this case means keeping multiple copies of files, so not only is your data safe, if you happen to screw up a file you can go back and get a previous version.
Since my offsite “backup” strategy is just about dealing with a catastrophic data loss, I don’t care about multiple versions of files. I’m happy just having the latest one available in case I need to retrieve it. So it is more of synchronizing my current data with the remote copy.
The first thing I had to do was choose a cloud storage provider. Now as my three readers already know I am not a smart person, but I surround myself with people who are. I asked around and several people recommended Backblaze, so I decided to start out with that service.
Now I am also a little paranoid about privacy, so anything I send to the cloud I want to be encrypted. Furthermore, I want to be in control of the encryption keys. Backblaze can encrypt your data but they help you manage the keys, and while I think that is fine for many people it isn’t for me.
I went in search of a solution that both supported Backblaze and contained strong encryption. I have a Synology NAS which contains an application called “Cloud Sync” and while that did both things I wasn’t happy that while the body of the file was encrypted, the file names were not. If someone came across a file called WhereIBuriedTheMoney.txt it could raise some eyebrows and bring unwanted attention. (grin)
Open source to the rescue. In trying to find a solution I came across rclone, an MIT licensed command-line tool that lets you copy and sync data to a large number of cloud providers, including Backblaze. Furthermore, it is installable on MacOS using the very awesome Homebrew project, so getting it on my Mac was as easy as
$ brew install rcloneHowever, like most open source tools, free software does not mean free solution, so I did have a small learning curve to climb. I wanted to share what I learned in case others find it useful.
Once rclone is installed it needs to be configured. Run
$ rclone configto access a script to help with that. In rclone syntax a cloud provider, or a particular bucket at a cloud provider, is called a “remote”. When you run the configurator for the first time you’ll get the following menu:
No remotes found, make a new one?
n) New remote
s) Set configuration password
q) Quit config
n/s/q> n
Select “n” to set up a new remote, and it will ask you to name it. Choose something descriptive but keep in mind you will use this on the command line so you may want to choose something that isn’t very long.
Enter name for new remote.
name> BBBackup
The next option in the configurator will ask you to choose your cloud storage provider. Many are specific commercial providers, such as Backblaze B2, Amazon S3, and Proton Drive, but some are generic, such as Samba (SMB) and WebDav.
Option Storage.
Type of storage to configure.
Choose a number from below, or type in your own value.
 1 / 1Fichier
   \ (fichier)
 2 / Akamai NetStorage
   \ (netstorage)
 3 / Alias for an existing remote
   \ (alias)
 4 / Amazon Drive
   \ (amazon cloud drive)
 5 / Amazon S3 Compliant Storage Providers including AWS, Alibaba, ArvanCloud, Ceph, ChinaMobile, Cloudflare, DigitalOcean, Dreamhost, GCS, HuaweiOBS, IBMCOS, IDrive, IONOS, LyveCloud, Leviia, Liara, Linode, Minio, Netease, Petabox, RackCorp, Rclone, Scaleway, SeaweedFS, StackPath, Storj, Synology, TencentCOS, Wasabi, Qiniu and others
   \ (s3)
 6 / Backblaze B2
   \ (b2)

...
I chose “6” for Backblaze.
At this point in time you’ll need to set up the storage on the provider side, and then access it using an application key.
Log in to your Backblaze account. If you want to try it out note that you don’t need any kind of credit card to get started. They will limit you to 10GB (and I don’t know how long it stays around) but if you want to play with it before deciding just remember you can.
Go to Buckets in the menu and click on Create a Bucket
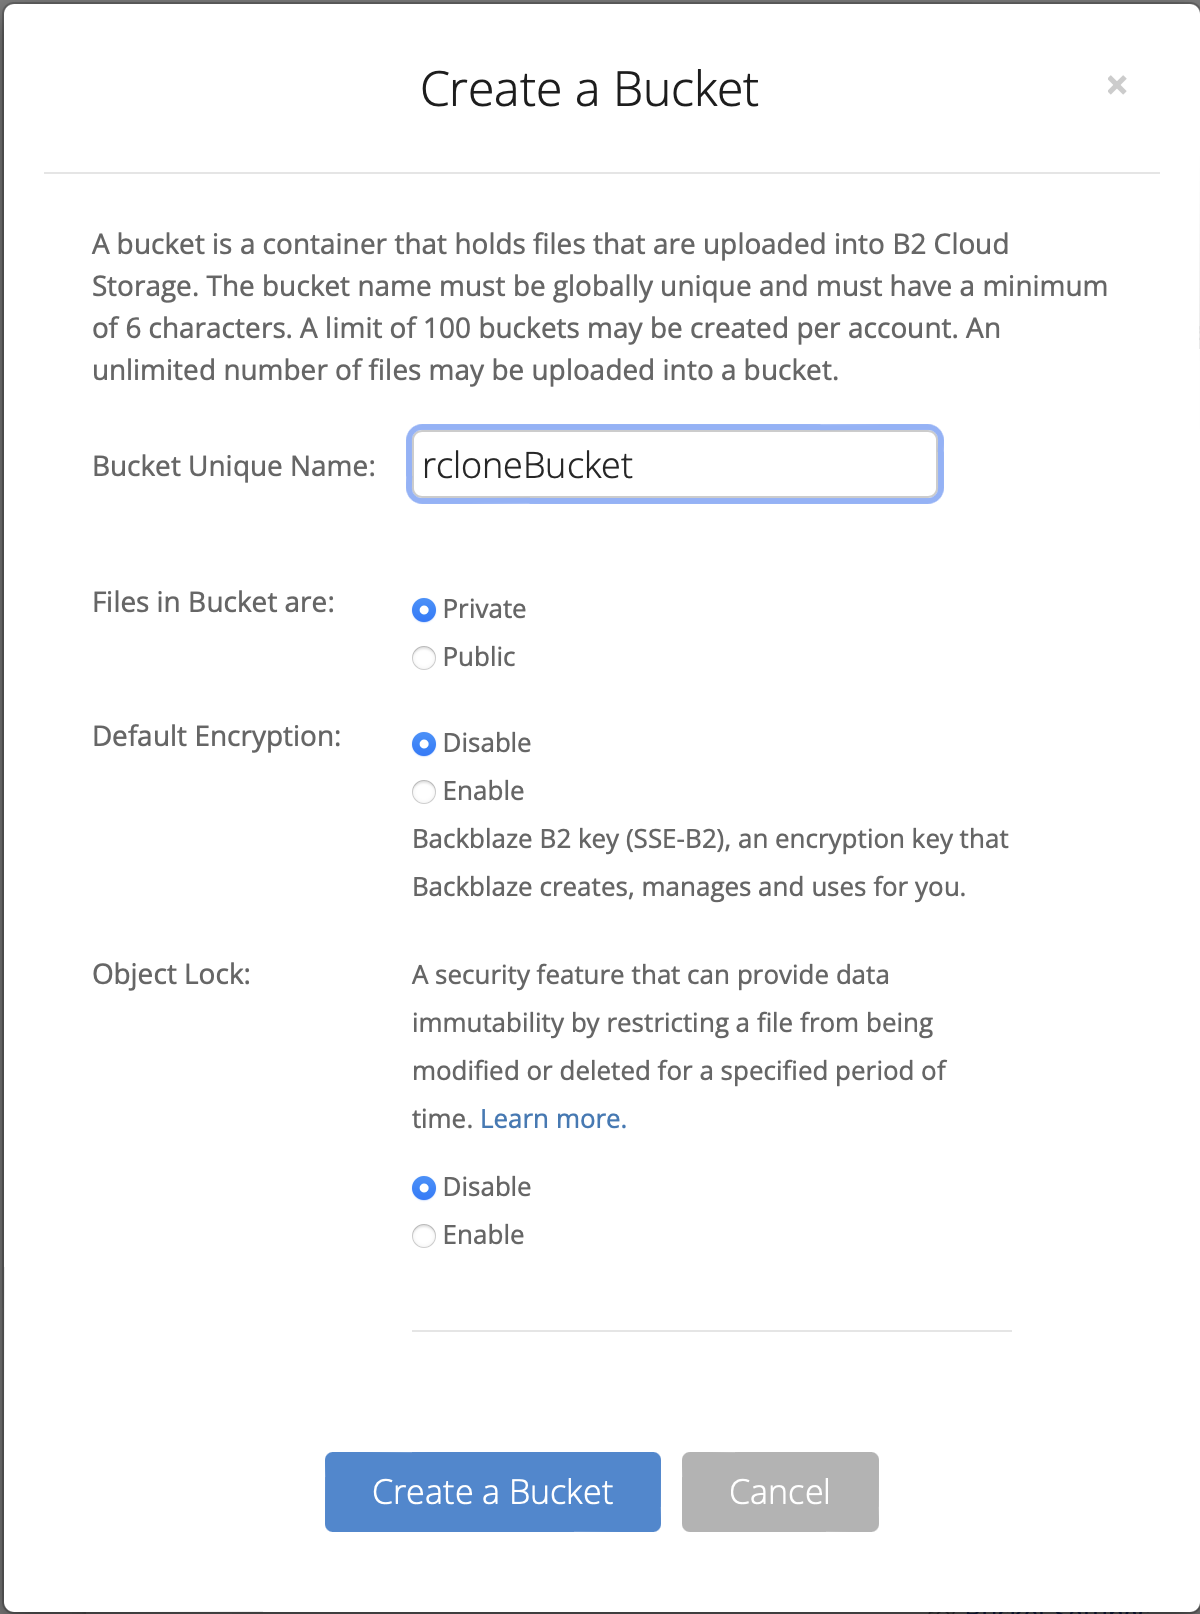
Note that you can choose to have Backblaze encrypt your data, but since I’m going to do that with rclone I left it disabled.
Once you have your bucket you need to create an application key. Click on Application Keys in the menu and choose Add a New Application Key.
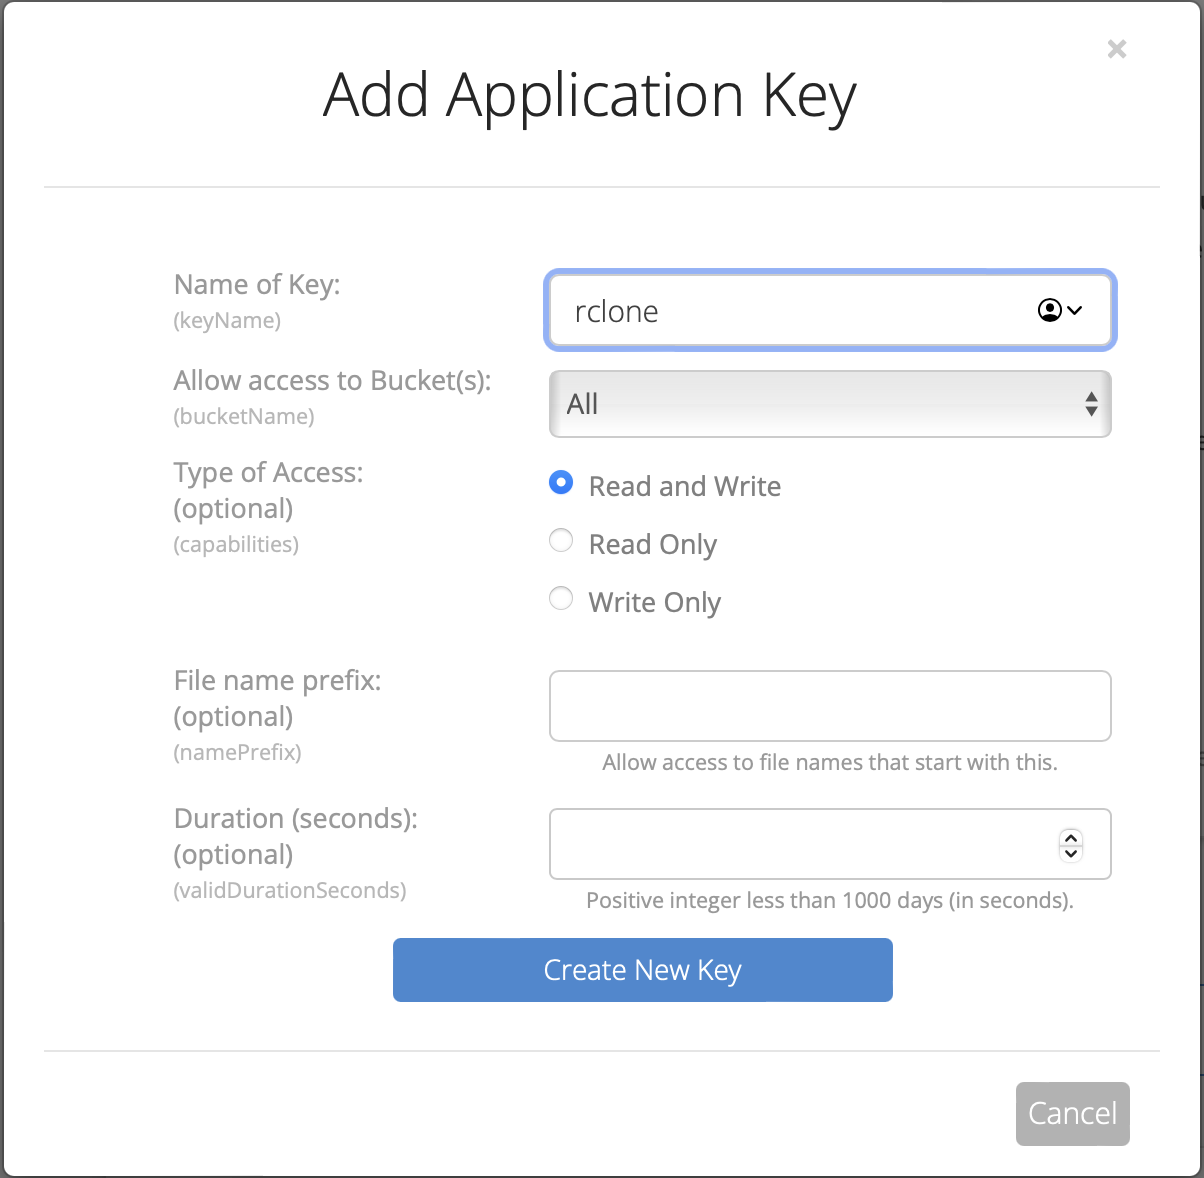
Now one annoying issue with Backblaze is that all buckets have to be unique in the entire system, so “rcloneBucket” and “Media1” etc have already been taken. Since I’m just using this as an example it was fine for the screenshot, but note that when I add an application key I usually limit it to a particular bucket. When you click on the dropdown it will list available buckets.
Once you create a new key, Backblaze will display the keyID, the keyName and the applicationKey values on the screen. Copy them somewhere safe because you won’t be able to get them back. If you lose them you can always create a new key, but you can’t modify a key once it has been created.
Now with your new keyID, return to the rclone configuration:
Option account.
Account ID or Application Key ID.
Enter a value.
account> xxxxxxxxxxxxxxxxxxxxxxxx

Option key.
Application Key.
Enter a value.
key> xxxxxxxxxxxxxxxxxxxxxxxxxx
This will allow rclone to connect to the remote cloud storage. Finally, rclone will ask you a couple of questions. I just choose the defaults:
Option hard_delete.
Permanently delete files on remote removal, otherwise hide files.
Enter a boolean value (true or false). Press Enter for the default (false).
hard_delete>

Edit advanced config?
y) Yes
n) No (default)
y/n>
The one last step is to confirm your remote configuration. Note that you can always go back and change it if you want, later.
Configuration complete.
Options:
- type: b2
- account: xxxxxxxxxxxxxxxxxxxxxx
- key: xxxxxxxxxxxxxxxxxxxxxxxxxx
Keep this "BBBackup" remote?
y) Yes this is OK (default)
e) Edit this remote
d) Delete this remote
y/e/d> y

Current remotes:

Name                 Type
====                 ====
BBBackup             b2

e) Edit existing remote
n) New remote
d) Delete remote
r) Rename remote
c) Copy remote
s) Set configuration password
q) Quit config
e/n/d/r/c/s/q> q
At this point in time, quit out of the configurator for a moment.
You may have realized that we have done nothing with respect to encryption. That is because we need to add a wrapper service around our Backblaze remote to make this work (this is that there learning curve thing I mentioned earlier).
While I don’t know if this is true or not, it was recommended that you not put encrypted files in the root of your bucket. I can’t really see why it would hurt, but just in case we should put a folder in the bucket at which we can then point the encrypted remote. With Backblaze you can use the webUI or you can just use rclone. I recommend the latter since it is a good test to make sure everything is working. On the command line type:
$ rclone mkdir BBBackup:rcloneBackup/Backup

2024/01/23 14:13:25 NOTICE: B2 bucket rcloneBackup path Backup: Warning: running mkdir on a remote which can't have empty directories does nothing
To test that it worked you can look at the WebUI and click on Browse Files, or you can test it from the command line as well:
$ rclone lsf BBBackup:rcloneBackup/
Backup/
Another little annoying thing about Backblaze is that the File Browser in the webUI isn’t in real time, so if you do choose that method note that it may take several minutes for the directory (and later any files you send) to show up.
Okay, now we just have one more step. We have to create the encrypted remote, so go back into the configurator:
$ rclone config

Current remotes:

Name                 Type
====                 ====
BBBackup             b2

e) Edit existing remote
n) New remote
d) Delete remote
r) Rename remote
c) Copy remote
s) Set configuration password
q) Quit config
e/n/d/r/c/s/q> n

Enter name for new remote.
name> crypt
Just like last time, chose a name that you will be comfortable typing on the command line. This is the main remote you will be using with rclone from here on out. Next we have to choose the storage type:
Option Storage.
Type of storage to configure.
Choose a number from below, or type in your own value.
 1 / 1Fichier
   \ (fichier)
 2 / Akamai NetStorage
   \ (netstorage)

...

14 / Encrypt/Decrypt a remote
   \ (crypt)
15 / Enterprise File Fabric
   \ (filefabric)
16 / FTP
   \ (ftp)
17 / Google Cloud Storage (this is not Google Drive)
   \ (google cloud storage)
18 / Google Drive
   \ (drive)

...

Storage> crypt
You can type the number (currently 14) or just type “crypt” to choose this storage type. Next we have to point this new remote at the first one we created:
Option remote.
Remote to encrypt/decrypt.
Normally should contain a ':' and a path, e.g. "myremote:path/to/dir",
"myremote:bucket" or maybe "myremote:" (not recommended).
Enter a value.
remote> BBBackup:rcloneBackup/Backup
Note that it contains the name of the remote (BBBackup), the name of the bucket (rcloneBackup), and the name of the directory we created (Backup). Now for the fun part:
Option filename_encryption.
How to encrypt the filenames.
Choose a number from below, or type in your own string value.
Press Enter for the default (standard).
   / Encrypt the filenames.
 1 | See the docs for the details.
   \ (standard)
 2 / Very simple filename obfuscation.
   \ (obfuscate)
   / Don't encrypt the file names.
 3 | Adds a ".bin", or "suffix" extension only.
   \ (off)
filename_encryption>
This is the bit where you get to solve the filename problem I mentioned above. I always choose the default, which is “standard”. Next you get to encrypt the directory names as well:
Option directory_name_encryption.
Option to either encrypt directory names or leave them intact.
NB If filename_encryption is "off" then this option will do nothing.
Choose a number from below, or type in your own boolean value (true or false).
Press Enter for the default (true).
 1 / Encrypt directory names.
   \ (true)
 2 / Don't encrypt directory names, leave them intact.
   \ (false)
directory_name_encryption>
I choose the default of “true” here as well. Look, I don’t expect to ever become the subject of an in-depth digital forensics investigation, but the less information out there the better. Should Backblaze ever get a subpoena to let someone browse through my files on their system, I want to minimize what they can find.
Finally, we have to choose a passphrase:
Option password.
Password or pass phrase for encryption.
Choose an alternative below.
y) Yes, type in my own password
g) Generate random password
y/g> y
Enter the password:
password:
Confirm the password:
password:

Option password2.
Password or pass phrase for salt.
Optional but recommended.
Should be different to the previous password.
Choose an alternative below. Press Enter for the default (n).
y) Yes, type in my own password
g) Generate random password
n) No, leave this optional password blank (default)
y/g/n>
Now, unlike your application key ID and password, these passwords you need to remember. If you loose them then you will not be able to get access to your data. I did not choose a salt password but it does appear to be recommended. Now we are almost done:
Edit advanced config?
y) Yes
n) No (default)
y/n>

Configuration complete.
Options:
- type: crypt
- remote: BBBackup:rcloneBackup/Backup
- password: *** ENCRYPTED ***
Keep this "cryptMedia" remote?
y) Yes this is OK (default)
e) Edit this remote
d) Delete this remote
y/e/d> y
Now your remote is ready to use. Note that when using a remote with encrypted files and directories do not use the Backblaze webUI to create folders underneath your root or rclone won’t recognize them.
I bring this up because there is one frustrating thing with rclone. If I want to copy a directory to the cloud storage remote it copies the contents of the directory and not the directory itself. For example, if I type on the command line:
$ cp -r Music /Mediait will create a “Music” directory under the “Media” directory. But if I type:
$ rclone copy Music crypt:Mediait will copy the contents of the Music directory into the root of the Media directory. To get the outcome I want I need to run:
$ rclone mkdir crypt:Media/Music

$ rclone copy Music crypt:Media/Music
Make sense?
While rclone has a lot of commands, the ones I have used are “mkdir” and “rmdir” (just like on a regular command line) and “copy” and “sync”. I use “copy” for the initial transfer and then “sync” for subsequent updates.
Now all I have to do for cloud synchronization is set up a crontab to run these commands on occasion (I set mine up for once a day).
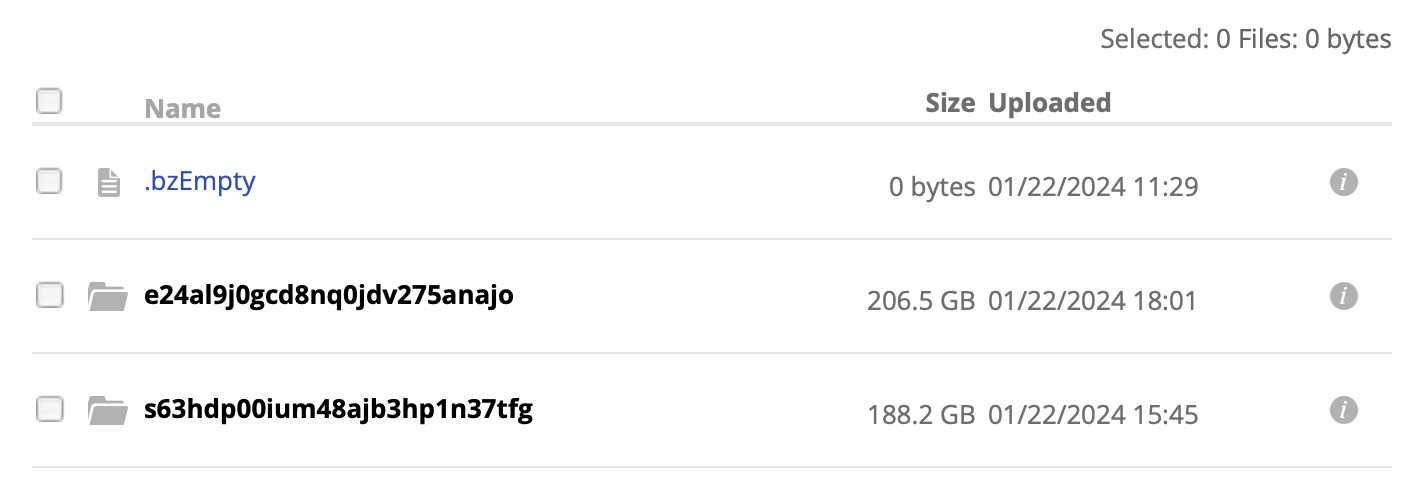
I can check that the encryption is working by using the Backblaze webUI. First I see the folder I created to hold my encrypted files:

But the directories in that folder have names that sound like I’m trying to summon Cthulhu:
As you can see from this graph, I was real eager to upload stuff when I got this working:
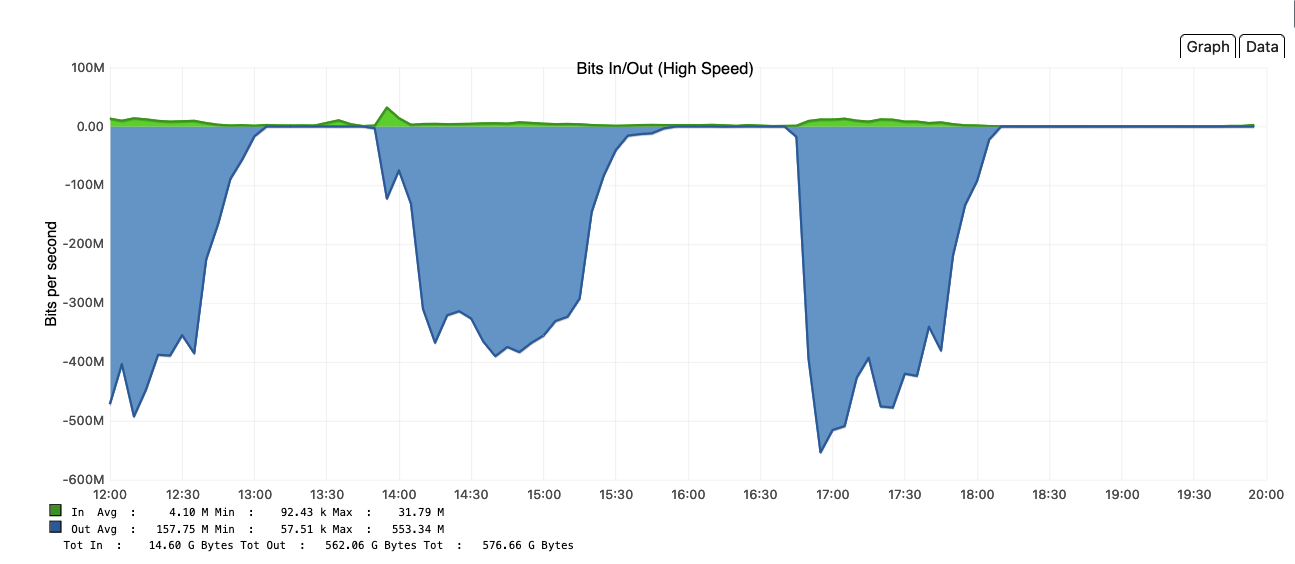
and on the first day I sent up nearly 400GB of files. Backblaze B2 pricing is currently $6/TB/month, and this seems about right:
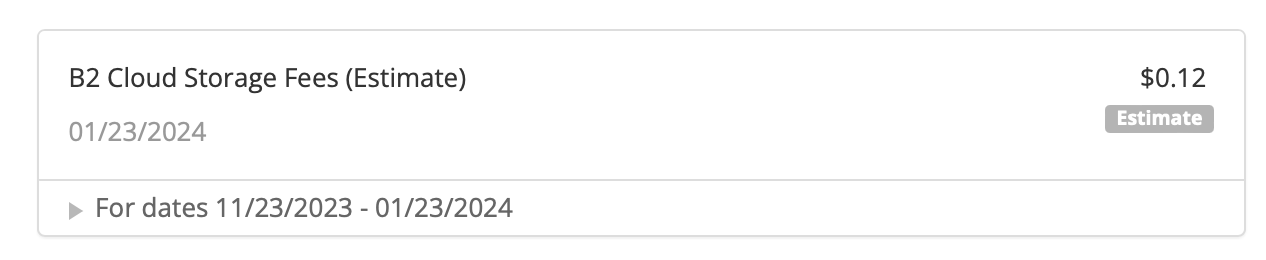
I have since doubled my storage so it should run about 20 cents a day. Note that downloading your data is free up to three times the amount of data stored. In other words, you could download all of the data you have in B2 three times in a given month and not incur fees. Since I am using this simply for catastrophic data recovery I shouldn’t have to worry about egress fees.
I am absolutely delighted to have this working and extremely impressed with rclone. For my needs open source once again outshines commercial offerings. And remember if you have other preferences for cloud storage providers you have a large range of choices, and the installation should be similar to the one I did here.