This weekend I wanted to play around with setting up Nextcloud on my home network (we already use it at work and it is awesome). Since I am planning on putting personal information into that app, I wanted to make sure that access to it was encrypted end-to-end.
This meant setting up SSL on my home web server. Now, it used to be that you either had to use a self-signed certificate (which could cause problems) or you had to spend a bunch of money on a certificate from a recognized Certificate Authority (CA).
Enter Let’s Encrypt. Launched in April of this year, Let’s Encrypt provides free certificates that are recognized by most of the things you need to recognize them.
I had been putting it off since dealing with certs is, quite frankly, a pain. You have to fill out a request, send it to the CA, get back a key file, install it in the write place, etc. Even with a free one I didn’t have time for the hassle.
I shouldn’t have worried – with Certbot it is dead simple. Seriously.
I went to their site (as directed from the Let’s Encrypt site) and just followed the instructions. I downloaded a script which downloaded all the required dependencies via apt, answered a few questions, and, bam, I had a functioning web server running SSL. They even prompted me if I wanted all requests to port 80 (http) to be redirected to port 443 (https) and when I said “yes” it did it for me.
The whole process took a couple of minutes.
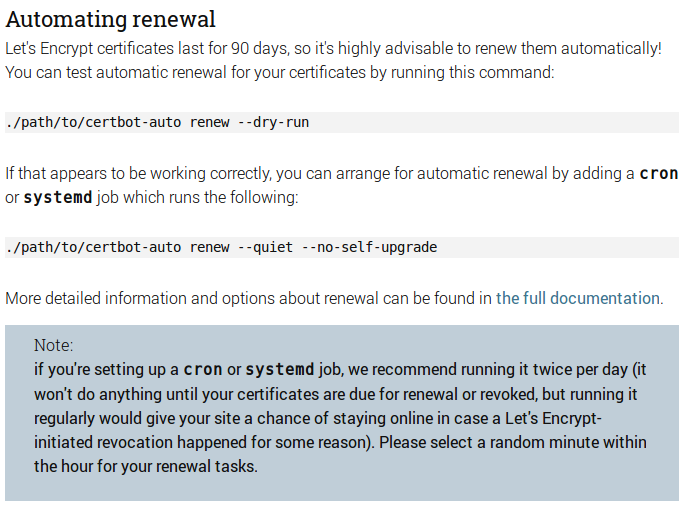
Amazing stuff. The certificates are only good for 90 days, but they even include an automated way to update them.
As more and more of our personal information becomes digitized, it is extremely important to use strong encryption. In the past this could be inconvenient if not outright difficult, but you really don’t have an excuse with Let’s Encrypt. Use it.