Those of you who have been following my #noapple efforts this year know that I am trying to move away from OS X to a Linux desktop. Part of that project involved installing Linux on my MacBook Air laptop.
As someone who travels a lot, I love this little laptop. Weighing just a kilogram, it is powerful enough to do what I need it to do yet small and light enough that I can easily carry it wherever I go in the world. In preparation for upgrading it to Linux, I wanted to increase the stock storage from 128G to 256G, so I purchased an OWC Mercury Auro Pro Express SSD from Macsales.
Unfortunately, I could not seem to get any Linux I tried to install to recognize the hard drive. Fedora failed and Ubuntu failed, but Debian squeeze worked. The downside was that squeeze really didn’t support the kind of desktop I was looking for so it wasn’t an option, and I resigned myself to using OS X on it until it could be replaced.
Recently, Gareth Greenaway posted on Google+ that Debian wheezy (testing) now supported Gnome 3, which was one of the desktops I wanted to try (Jeff Gehlbach has been using it on his Macbook Pro on Fedora for months now). I figured that if squeeze worked, wheezy would too, so I should give it a shot.
Nope – wheezy wouldn’t recognize the drive either. However, being the industrious man that I am, I simply installed squeeze and then did a dist-upgrade to wheezy (yes, this is something I call “fun” – I’m weird that way).
I found out the issue was with the Linux 3.1 kernel. Whenever I tried to boot I would get an error like:
ata1.00: exception Emask 0x0 Sact 0x0 SErr 0x0 action 0x6 frozen
ata1.00: failed command: IDENTIFY DEVICE
followed during boot with errors like:
ata1.0: failed command: FLUSH CACHE EXIT
and then the system would just stop.
However, there was an option to boot to the 2.6 kernel and it would load fine, but with everything compiled against 3.1 I wasn’t able to get things like a video driver working.
Since my desire to run Linux was stronger than my desire to have a large … hard drive, I replaced the SSD with the old one and the disk errors went away.
The following are the optimized steps I took to get wheezy on my Macbook Air (MacbookAir3,1), and when I was successful (it took several attempts to get this to work exactly like I wanted – again, this is “fun”) I did the same install on my 24-inch iMac (iMac9,1 for those of you keeping score at home). The steps could probably be optimized a bit more, but since this works for me I wanted to write it down just so I wouldn’t forget it the next time I needed it, and perhaps it would prove useful for others. I relied heavily on the Debian documentation as well as this post by Mike Dentifrice which was extremely valuable. His was based on Debian squeeze and a lot of what he had to do by hand is now pretty much automatic in wheezy.
You’ll need:
- Your Macbook Air
- An external hard drive if you want to save your existing OS X install
- Your OS X install disk/USB stick
- An external USB CD or DVD drive (I got mine on amazon.com)
- An external USB Ethernet dongle (not strictly required but helps immensely)
- A DVD or CD with 64-bit Debian wheezy (testing)
Note: I’ll state below the differences for installing on the iMac, but the process is pretty much the same.
If you want to save your existing install, start off by using Time Machine to back it up to the external hard drive. Note how much disk space your install uses, since that will be necessary to know when we partition the drive in preparation for installing Linux.
Once that is done, insert your OS X install media and boot it. Choose your language and when you get to the first install screen, launch Terminal from the Utilities menu.
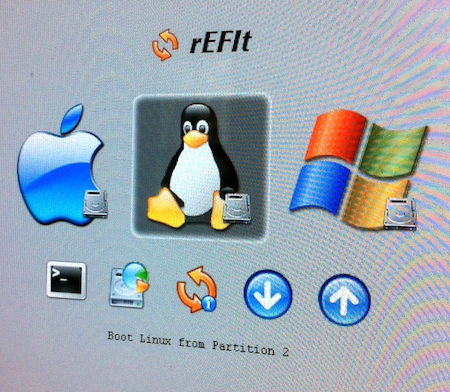
At this point I need to talk a bit about how Apple hardware boots. Instead of using BIOS, it uses EFI (Extensible Firmware Interface). EFI based drives are partitioned using GPT (GUID Partition Table) which differs from the MBR (Master Boot Record) that has been the standard for decades. While I have been told that it is possible to boot Linux using EFI, most are still set up to use MBR, so we will use an open source tool called rEFIt to emulate the MBR.
The key thing to note is that MBR can only boot from a “primary” partition and there can only be four of them. Since EFI requires a small partition as well, that limits you to three operating systems (one on each of the remaining three primary partitions). While storage on my Macbook Air isn’t enough to support, say, a Windows partition, my iMac can and I’ll point out below the change I made for that install (so I plan to dual-boot my Macbook and tri-boot my iMac).
GPT does support a large number of partitions, theoretically unlimited, but systems such as Windows may limit them to 128, so as long as you don’t need more than three boot partitions you can have as many as you like.
For my Macbook Air I decided to have two partitions, a /boot partition and an encrypted root partition. I’ll add a swap file first thing after install. Since only the /boot partition has to be one of the three, I could have made a separate swap partition and a /home partition like I use with my desktop at the office. Having a separate /home partition is great if you upgrade or play around with distros a lot, but I simply didn’t want to have to type in my passphrase twice when booting.
Now, you can install Linux on your Macbook without OS X, but I still have a fondness for Snow Leopard and just in case there are any firmware upgrades I wanted the option to apply them (although one could always install OS X on an external drive and boot to it for that purpose). Since I am worried that I might end up in a situation where I need to boot into OS X (say that I am at a customer site and their VPN doesn’t work on Linux) I also wanted to keep it around for a fallback. But I wanted a really stripped down OS X so I decided to only reserve 30G for that partition.
My partition layout is thus: 30G for OS X, 256M for /boot and the rest for Linux. On my iMac, which I’ve upgraded to a 2TB drive, I’m using 700G for OS X, 256M for /boot, 300G for Windows and the rest for Linux. If you need more for your OS X install, change these values or remove some kruft from OS X (I’d start with Garage Band).
Now if you remember above I asked you to launch Terminal. We’re going to use the command line to partition the disks. On the Macbook Air I ran:
diskutil parititionDisk disk0 3 "Journaled HFS+" Mac 30G "MS-DOS FAT32" boot 256M "MS-DOS FAT32" Linux 50G
This will launch the Disk Utility and partition disk0 into three partitions (four if you include the hidden EFI partition). The first one will be labeled “Mac” with 30G of storage, the second will be labeled “boot” with 256M of storage and the last one will be labeled “Linux” with the remaining disk space. I just put in 50G because you’ll get an error if it is too large, but if it is smaller than the remaining disk space it will use all of it.
For my iMac I used:
diskutil parititionDisk disk0 4 "Journaled HFS+" Mac 700G "MS-DOS FAT32" boot 256M "MS-DOS FAT32" Windows 300G "MS-DOS FAT32" Linux 50G
Again, please note that the bootable partitions have to be in the first three, thus my “Linux” partition will not be used for booting.
This should run without errors and will display the final partition sizes, so you can check that the Linux partition is indeed larger than was you put in the command. Now quit out of Terminal.
The next step depends on whether or not you want to restore from your Time Machine backup or install a fresh OS X. I used this opportunity to downgrade from OS X Lion (which I utterly despise). If you want to restore from Time Machine, you can do so from the Utilities menu, and if you want a fresh install, just follow the normal install steps.
I had encrypted my hard drive under Lion, so when I did this the first time it yelled at me that I couldn’t install onto the Mac partition. A reboot back into the install media fixed that (there was no need to repartition).
At this point in time, you should have a working OS X install. You can do OS X-y things such a turn on FileVault and Software Update at this time if you so choose, but we really just need to use it to install rEFIt.
Download rEFIt and launch the installer package. Under “Customize” be sure to check the only unchecked box to make sure support for Linux filesystems is enabled. Once it is installed, launch Terminal and run:
sudo /efi/refit/enable.sh
which will “bless” the system to boot into rEFIt.
At this point in time I insert my Debian wheezy install media and restart.
rEFIt should recognize the media and offer it as an option, or you can simply hold down the option key after the initial “bong” and select it there, In any case you want to launch the Debian installer.
Follow the install prompts as you would normally. When you get to loading the network hardware you should get an error about missing firmware for the Broadcom wireless card. Here is where it would be possible to load in the firmware, but my time is valuable and it was much easier just to skip that step and use the external USB Ethernet dongle. This was the same on the iMac, but there I just used the built-in wired Ethernet.
When you get to the part about laying out the disk partitions, choose “Manual”. This will bring up the existing partition table. You should see the “hidden” EFI partition first, followed by the ones you created using the command line Disk Utility. There will most likely be some “free” space in between those partitions to make the logical layout match the physical one, and I’ve never been successful at choosing the right values to make those zero. They can be ignored.
Find the partition you labeled “boot” and set the O/S to use it as an ext4 partition mounted on /boot. Important: note the device label. On my install it was the third partition (after EFI and the OS X HFS+ partition) so it was /dev/sda3, but if you used a different layout this could change. We have to install grub into this partition so it is important to note and I had problems with the installer if I went back to check it later.
Next, find your Linux partition and set it up to be used as an encrypted filesystem. The step is optional but I am paranoid, especially when it comes to data on a portable device like a laptop. Unless you are super paranoid and have a lot of time on your hands, make sure the “erase” option is set to “no”. If you forget, don’t worry, you can change it later but if it is set to “yes” then the entire partition will be overwritten with random data before you can go forward and on large disks this can take forever (days on one 2TB drive I used).
When you get back to the partitioning menu, choose the option to set up encrypted file systems. You should be prompted to write current changes to disk, so choose “yes”, and if you forgot to change the erase option you’ll be prompted here and you can say “no” to save some time. Choose the option to set up encrypted partitions, choose the Linux partition and set it up to be ext4 and mount as “/”. You’ll be prompted to enter in your passphrase (don’t forget it or you are screwed).
Once finished, exit the partitioner, write changes to disk, and the install proceeds like normal.
When you get to the part about installing packages, leave the default options as-is, but I always check the SSH server option as well. Feel free to add others if you want, of course.
The next step will take some time depending on the speed of your network (at home this takes a little over an hour). Eventually you’ll be prompted to install the grub bootloader. It will mistakingly state that Linux is the only operating system on this computer (it does so because we haven’t enabled MBR emulation yet) so choose “no” when it asks if you want to install grub into the MBR. Instead, make sure it installs into your /boot partition (as noted above, /dev/sda3 on my system).
Finally, you should reach the end of the install, the media will be ejected and you can reboot.
This time when rEFIt comes up, use the right arrow to select rEFIt’s partitioning tool and allow rEFIt to update the MBR emulation. If everything has gone smoothly, this should work without a hitch. Restart the computer (right arrow over to the Restart icon). I’ve found that any time I run the rEFIt partitioning tool it is a good idea to restart, whether or not there are changes.
Now you should see an OS X option and a Linux option (there may be a grayed out Windows option if you created a Windows partition). Choose Linux and you should be rewarded with a grub menu. Before the 5 second timeout, hit “e” to edit the boot options.
Find the line that starts “linux” and ends in “quiet”. You’ll need to add the word “text” after “quiet” for this next step. On my iMac I also had to add the “nomodeset” option to prevent the graphics driver from hanging the system.
Both the Macbook Air and the iMac use NVIDIA graphics cards. The open source nouveau driver works on the Macbook Air but not on the iMac. Unfortunately, I could not get sleep to work on the Macbook Air under nouveau (which is a pity, since everything else seemed to work, and yes, I spent hours playing with quirks to see if that would help). So at this time I recommend installing the proprietary NVIDIA driver.
The “text” option will prevent the window manager from loading and give us a command line login. Log in as root. At this point I simply determine the current IP address with “ifconfig eth0” and I ssh in from another computer. This lets me cut and paste, etc., but the command line works as well.
First off, we need to create a swap file. Since I have a Macbook Air with 4G of memory, I wanted to create an 8G swap file:
Type following command to create an 8G swap file (1024 * 1024MB * 8 = 8388608 block size):
# dd if=/dev/zero of=/swapfile bs=1024 count=8388608
Set up a Linux swap area:
# mkswap /swapfile
Activate /swapfile swap space immediately:
# swapon /swapfile
To activate /swapfile after Linux system reboot, add entry to /etc/fstab file. Open this file using a text editor such as vi:
# vi /etc/fstab
and append the following line:
/swapfile swap swap defaults 0 0
Next, since the proprietary NVIDIA driver is not free, add “contrib” and “non-free” to your /etc/apt/sources.list file:
deb http://ftp.us.debian.org/debian/ wheezy main contrib non-free
deb-src http://ftp.us.debian.org/debian/ wheezy main contrib non-free

deb http://security.debian.org/ wheezy/updates main
deb-src http://security.debian.org/ wheezy/updates main
Run
apt-get update
to load in the new sources.
Now, at this point in time, it is possible to install the NVIDIA drivers and there are a number of ways this can be accomplished. I used module assistant to build from source:
# apt-get install module-assistant nvidia-kernel-common
followed by
# m-a auto-install nvidia-kernel${VERSION}-source
Typing that command exactly as printed (without the leading # of course) should work.
Once the module is built, run
# apt-get install nvidia-glx
which looks like it will modify X to use the “nvidia” driver, but it doesn’t. I found out that I had to perform an extra step.
Run
# Xorg -configure
and it should throw a number of errors but create a file in root’s home directory called xorg.conf.new. Copy that file to /etc/X11/xorg.conf and edit it. You should see some entries under “Device” that look like:
Section "Device"
        ### Available Driver options are:-
        ### Values: <i>: integer, <f>: float, <bool>: "True"/"False",
        ### <string>: "String", <freq>: "<f> Hz/kHz/MHz",
        ### <percent>: "<f>%"
        ### [arg]: arg optional
        #Option     "SWcursor"                  # [<bool>]
        #Option     "HWcursor"                  # [<bool>]
        #Option     "NoAccel"                   # [<bool>]
        #Option     "ShadowFB"                  # [<bool>]
        #Option     "VideoKey"                  # <i>
        #Option     "WrappedFB"                 # [<bool>]
        #Option     "GLXVBlank"                 # [<bool>]
        #Option     "ZaphodHeads"               # <str>
        #Option     "PageFlip"                  # [<bool>]
        Identifier  "Card0"
        Driver      "nouveau"
        BusID       "PCI:2:0:0"
EndSection
Remove all such sections (I had three) and add:
Section "Device"
        Identifier      "Device0"
        Driver          "nvidia"
        Option          "NoLogo"         "True"
        VendorName      "NVIDIA Corporation"
        BoardName       "GeForce 320M"
EndSection
At this point you should be able to reboot into all that Gnome 3 glory. Note that the BoardName is just a label, I used something similar on my iMac which is not a 320M.
From here on out it is just a little cleanup. On the Macbook Air I had to add support for the touchpad.
# apt-get install libmtdev1 mtdev-tools xserver-xorg-input-multitouch
and then I removed /usr/share/X11/xorg.conf.d/50-synaptics to prevent conflicts. Now my touchpad works fine (use two fingers to right click). Reboot or restart X for this to take effect.
I also installed gnome-tweak-tool and reduced the font size from 11 to 8 to better make use of my screen real estate. These last two steps were not required on the iMac.
Finally, I installed the proprietary Broadcom drivers using module assistant:
# m-a a-i broadcom-sta
followed by:
# echo blacklist brcm80211 >> /etc/modprobe.d/broadcom-sta-common.conf
and a reboot.
The only issue I have at the moment is that when I first start the wireless, it bounces up and down for a couple of minutes. When it finally connects, everything is cool. This happens as well with an external Asus USB-N13 I bought as a backup (since I had heard that Broadcom under Debian had issues) so something else must be going on, but I figure I’ll cross that bridge when I come to it later.
[UPDATE: Turns out that the issue dealt with IPv6 support and my router. I disabled IPv6 in Network Manager and my bounce issues went away]
If you want to install Windows for a tri-boot setup, you can do it now. Just choose the Windows partition in the installer.
At this point, everything seems to work (well, for certain values of “work”). Bluetooth functions and I tested the camera with cheese.
One last trick – if you want rEFIt to boot Linux by default, edit /efi/refit/refit.conf and uncomment the default_selection:
# Set the default menu selection.  The available arguments match the
# keyboard accelerators available within rEFIt.  You may select the default
# loader using a one-character abbreviation for the OS name ("M" = Mac OS X,
# "L" = Linux, "W" = Windows).  You may also specify a digit between 1 and
# 9, in which case the Nth loader in the menu will be the default.  You can
# also select a rEFIt tool entry ("S" = EFI Shell, "P" = Partitioning Tool,
# "U" = shutdown).  This is intended as a quick fix to change the default
# boot choice until full configurability arrives.
#
default_selection L
This procedure is the result of about ten installs so I hope it saves others some of the time I spent. In any case, I am now much more knowledgeable about how things work, so in the end it was worth it. Plus, I’m on a much freer operating system than the one I left. It was fun.
Thanks to all those faceless documentation writers out there that made this possible. I have tried to embed links where possible to give you the credit.